Wednesday, 6 April 2011

Recipe Card Holder

Do ever feel that your recipes are scattered all over, from the cupboard, tacked to the fridge, to that messy book with your clips of magazines of ideas for new dinners. Well I have been feeling like this and had to finally do something about it. So I made a handy dandy card holder.
This is what I used:

Set of recipe cards -Dollar store :)

2 Double fusible interfacing cut to the size of my cards

2- pieces of fabric cut the same as the interfacing (front)

And another color of fabric cut the same for the inside

Oh and 2 rings to hold it all together

Here are all the supplies laid out ready to put together

There it is... pretty quick and easy!!
And there are my cards ready to fill with the recipes

I have, as well as many more that I find!!
Well there you go!! A nice a neat place to keep

all of your treasured recipes. I also thought

to organize it a bit further is to make tabs

for different kinds of recipes!!

Off to more crafts!!

~Rebecca

Monday, 4 April 2011

Two of A Kind

This post is a little late.. :) But it is still one that I need to make. Well about a month and a half ago I finished a pair of socks for my good friend Mrs. Hardy!! I started this project I think in November and worked on them during the winter season!! Well here are some pictures of the project.
Here they are all finished!! One thing about socks are that you make one, and feel good that you finished it, until you realize you have to do it all over again to finish the pair :) Knowing that Mrs. Hardy had a sweater that matched the colors in the socks, I thought I should make something to wear on the sweater. So I made her a flower pin!! It was fun and really easy. It only used a little bit of yarn as well which is nice to use up the extra bit of yarn from your project. Well there you have it another project done. On to the next... :) ~Rebecca

Monday, 21 March 2011

An Apron For Sewing

Well, Hannah (the other writer on this blog) birthday is this Thursday, And because she is leaving for Georgia tomorrow (not fair :) I had to give this to her a little early.

Here is her card, I tried to make
it a bit vintage looking cause that is
Hannah's style!
This is how I wrapped her gift, in some fabric that I
thought she could use to make something.

Here is the pattern I used...And the messy desk, cutting out pieces.........

And here it is, a sewing apron,
to hold all the little things while you are
sewing the seems!!
Here are the different pockets, This is the small
scissor pocket.
Felt square for your hand needles.

Just an ordinary pocket.

Pocket with places for pencils and pens.

One large pocket.

A pin cushion and a small pocket underneath.


I thought it would be neat to fill some of the pockets,
So I found some things, like 2 patterns, scissors, and some other
stuff.

And there you have it, Cute huh?? I thought the fabric
was just to cute not to make something out of!!
Well HAPPY BIRTHDAY dear friend!! I hope you find this
useful in the days and years to come!!
With Love,
Rebecca

Saturday, 12 March 2011

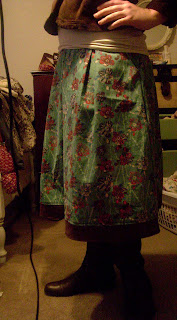
Aqua Drifting Blossom Skirt

With the weather being so gloomy from the rain, I decided to pull out some projects that I have been wanting to start. This is one of them, I ordered this fabric almost 7 months ago, for only $3 a yard! I bought it from a online quilting supplier. I had seen it when it was regular priced and thought it was cutie but not cutie enough to buy. So when it went on sale I couldn't help it :) I bought 2 1/2 yards plus 1/2 yard of the coordinating brown. Any ways here are some pictures from along the way.
Here's the pattern I used. It was different than any that I have
ever used, for it was made so that, (in a way)
you could design the skirt yourself!

Here is my messy desk, while cutting
out the fabric.

Thread!

Here is some of the sewing being done!
I believe this is the yoke of the skirt.

Here it is, almost all done, at this point I had the
zipper and the contrast edging to sew on.

Here you can see the print of the fabric.

And there it is, All done!! Front view

Side view.
So there you have it, a new skirt. I really liked this pattern.
it was easy and didn't use to much fabric.
Until my next project
(which should be next week)
~Rebecca

Monday, 28 February 2011

Two Wallets for Two Good Friends

This last week was Andra and Michaela's Birthdays! Two very good friends of mine! A while ago Hannah and I made wallets, and these two happened to see them at some point and mentioned that they both wanted one, I said to them that if you got the fabric I would make it for you. So about a month ago, I remembered these conversations and thought it would be nice to make them as a surprise. So I picked out fabric that seemed to go with there style. I also made them each a card. Here are some pictures.
Michaela's Card
And wallet


And Here's Andra's Card
And Wallet

When I made my wallet there were some difficulties in the size
of pockets and such, so with these I made sure to
measure the pockets, so that cards and money would fit into them!
Happy Birthday Andra and Michaela! I hope you like them!!
Well that is all for now!
~Rebecca

Monday, 14 February 2011

Re-Do Shoes

Working at Joann's requires a certain dress code, one of the the codes is to have black closed toed shoes. So I have been on the look out for a pair of black flats that I could wear with my skirts. So when I found these shoes for $5 at Walmart, I couldn't help but buying them. The only thought was that they were quite plain. So I also bought some ribbon to dress them up!!
Here are all of my supplies.
-1 pair of flats
-ribbon
-2 buttons
-1 pair of scissors
-thread and needle
-and a hot glue gun

I decided to make a bow, with a button center and attach it to the
front side of the shoes! Here is the finished product!


I had fun taking pictures of my "new" shoes!!


I love to buy something cheep, or getting it for free and
making it into a completely different item.
It is fun to get creative with what you have and really enjoy
the out come of the product!!
That is all for now,
Rebecca

Monday, 7 February 2011

Button Top Pin Cushion

In the four years I have sewn, I have never had a pin cushion of my own. I don't know why I have not made one sooner, but what ever the reason, I made one for myself! But it is not only a pin cushion, it is also a top to my jar of buttons Here is how I did it.
After and before pictures, the after pictures
is way better.


Here is the fabric I used. The next picture is how I cut each piece.
I cut out a circle and then cut it into pie shaped pieces,
then I cut two of each fabric.

Here is all the pie pieces sewn together, with a based stitch
on the out side edge. After pulling the based stitch and stuffing
it, creates a nice looking round pillow.

Then I defined the seam line and added a button for
decoration. It looks way cutier that way!!


Next I hot glued some ribbon on the edge of the lid and glued the
cushion to the top of the lid.


And there you have is and great pin cushion!!

What do you think?? Adorable huh?? I thought it turned out
nice! Rather than looking at an old jar lid, I have a
pin cushion instead!
Until next time,
Rebecca